Step 1
Make a new document that is 1500px wide x 1000px high. I decided to make the document extra large for ease to work with so we can see the effects really well. With the Text Tool, set your text in a font that looks similar to the image below. I used the font Blackoak STD. Kern and scale the font as you desire.Step 2
Load the transparency of the text layer by clicking on the layer’s thumbnail while holding Command. Go to Select>Refine Edge. We want to expand the selection and keep it sharp at the same time. To do this, use the settings below. Make a Solid Color Adjustment Layer below the text layer and fill it with a dark gray.Step 3
While holding Option/Alt, drag the gray layer in the Layer Palette down slightly until you see a thick black line below it. This will duplicate the layer below the original. Grab the Move Tool (V), then hit the down arrow once and the left arrow once. Repeat this step 25 times.Select all the gray layers and hit Command+E to merge them. Duplicate the merged layer once. Then manually drag the new one down and to the left until it lines up correctly. Merge the two gray layers into one.
Step 4
Use the Ellipse Tool whole holding Shift to create a perfect circle. Make sure the Create Paths button is checked on the property bar. Make a Solid Color adjustment layer below the Gray layer and fill it with the same gray. Duplicate the circle layer and change the fill to white. Hit Command+T to use Free Transform. While holding Shift+Option/Alt, scale it down to about 75%. Place it where you see fit.Step 5
Select the Line Tool. Again, make sure that Create Paths is checked on the Property Bar. Set the weight to 60px. While holding Shift, make a line that is angled 45 degrees. With the path you made selected, make a Solid Color Adjustment Layer and fill it with a burnt orange color.Duplicate that layer and hit (Command+T) and then Right Click and select Flip Horizontal.
Step 6
Select the orange line layers and go Layer>Group Layers. With the group selected, hit the Add Layer Mask button and create a mask. Hit it another time to make a vector mask. Select the vector mask from the white circle layer. Hit Command+C to copy. Select the vector mask on the "lines" group then hit Command+V to paste. Hit Command+T and scale down the path slightly so there is a little space between the path and the edge of the gray circle.Select the transparency of the gray lettering. Go to Select>Transform Selection. Move the selection up and to the right slightly so the distance between the "e" and the selection is the same as the white gap we just created. Select the mask of the orange lines group. Fill the selection with black to mask it out.
Step 7
Create a new Alpha Channel in the Channels Palette. Go to Filter>Render>Clouds. Hit Command+T and scale the clouds up to about 180%. Load the selection of the Channel by holding Command and clicking on its thumbnail. In the Layers Palette, create a new Solid Color adjustment layer just above the background. Make the fill 50% gray (#808080). Blur the cloud mask with a 30px Gaussian Blur.Just above that layer, create a Gradient Adjustment Layer and set up the gradient to go from transparent from the top-left to white at the bottom-right.
Step 8
Just above the clouds layer, make a Curves adjustment layer that looks like the image below. Invert the mask so that the curve is not visible.Step 9
Now we are going to load some grungy-looking brushes that we can paint the curve back in with. I used the spray paint texture brushes from Spoon Graphics: Free Hi-Res Spraypaint Photoshop Brushes Set Two.Load the brushes and select the one you want. Click on the Curves Layer Mask, make sure your foreground color is white, and set the Opacity of the brush to 50%. Setup your brush with the following Shape Dynamics in the image below. The Size Jitter and the Angle Jitter are the things that you want at 100 percent.
Step 10
Now just click around a few times until you get an effect that you like.Step 11
Finally, lets put the color into this thing. Make a Solid Color adjustment layer above the clouds, the curve, and the white gradient. Make the Fill a cyan/blue color. Set the layer’s Blending Mode to Color.Step 12
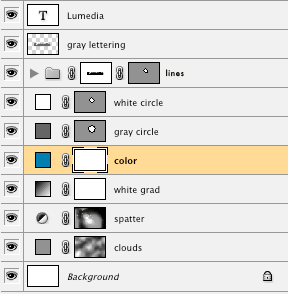
I know we have added a lot of layers, so below is what my Layer Palette looks like for comparison.Step 13
Select the gray lettering layer’s transparency by holding Command and clicking on its thumbnail. Go to Select>Transform Selection and scale it up 250-350%. You can also offset its position if you want to. Make a Curves adjustment layer just above the color layer and bring up the brightness a little, like the image below.Step 14
Do the same thing with the orange line layers. On the Curve layer that you made for the orange lines, we are going to fade the edges out. While holding Option/Alt click on the layer’s mask. Grab the Gradient Tool (G). Have the Gradient go from a Black to White fade, set the mode to Multiply on the property bar, and make it a Radial Gradient. Drag from the center of the ‘X’ to the edge. This will make it fade out.Final Image
Now place the ‘X’ where you see fit, and you’re done!perfect post! it helps a lot, what are you waiting for? try it now!!
Article source: http://psd.tutsplus.com/designing-tutorials/create-a-cool-music-logo-on-a-grunge-background/


No comments:
Post a Comment